SureShotStrategies Blog

Tracking crashes memory heap errors for OBIEE processes March 12, 2009

Filed under: Uncategorized — sureshotstrategies @ 3:21 pm

For capturing process characteristics when the server hangs or terminates unexpectedly, we can use User Mode Process Dumper. The User Mode Process Dumper (userdump) dumps any running Win32 processes memory image (including system processes such as csrss.exe, winlogon.exe, services.exe, etc) on the fly, without attaching a debugger, or terminating target processes. Generated dump file can be analyzed or debugged by using the standard debugging tools.

Userdump: http://www.microsoft.com/downloads/details.aspx?FamilyID=E089CA41-6A87-40C8-BF69-28AC08570B7E&displaylang=en

Instructions for creating Dump

http://support.microsoft.com/default.aspx?scid=kb;en-us;241215

Analysis of the dump can be done by the debugging tools for Windows

Debugging Tools for Windows:

32 bit: http://www.microsoft.com/whdc/devtools/debugging/installx86.mspx

64 bit: http://www.microsoft.com/whdc/devtools/debugging/install64bit.mspx

For tracking memory log issues there are # of utilities

Perfmon is the most comprehensive

Memlog is another utility that gives memory log for a process and writes to a file

Sysinternals has memory utilities

Blat is a program to set emails automatically on an event

Also for Windows 32 bit /3G switch can be set using the instructions in

http://www.microsoft.com/whdc/system/platform/server/PAE/PAEmem.mspx


Adding clear my filter link to a Dashboard page March 10, 2009

Filed under: Uncategorized — sureshotstrategies @ 4:49 pm

Current OBIEE Dashboard prompts selections and clearing the selected default is little cubersome.

In some situations it helps to clear the selected prompts and start-over. For that there is a “Clear my Selection” option available in the Page Option.

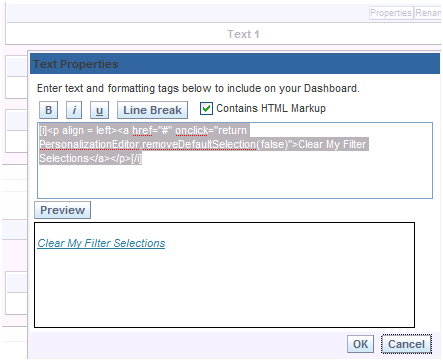
Sometimes it may also be useful to explicitly put an HTML link just next to the prompts so that it is easily reachable by a novice Dashboard user.

This can be easily accomplished by using a little HTML Text block on the page and put following HTML in the Text block that contains HTML markup


Some Custom Text Syntax examples January 22, 2009

Filed under: Uncategorized — sureshotstrategies @ 10:06 pm
Tags:

@[html]”<a href=””saw.dll?Dashboard&PortalPath=/users/administrator/_portal&Page=HiddenPage2&Action=Navigate&col1=dual.ppPage1&val1=BreadCrumbs&col2=dual.ppPath1&val2=/users/administrator/_portal&col3=dual.ppPage2&val3=Filterview2&col4=dual.ppPath2&val4=/users/administrator/_portal””>”@”</a>”

@[html]”<a href=””javascript:void(null)” onclick=”PortalPageNav(”,’/users/administrator/_portal’,’HiddenPage2′); return false”>”@”</a>”

@[html]”<a href=””javascript:void(null)”” onclick=””PortalPageNav(”,’/users/administrator/_portal’,’HiddenPage2′); return false””>”@”</a>”

saw.dll?Dashboard&PortalPath=/users/administrator/_portal&Page=HiddenPage2&Action=Navigate&col1=dual.ppPage1&val1=BreadCrumbs&col2=dual.ppPath1&val2=/users/administrator/_portal&col3=dual.ppPage2&val3=Filterview2&col4=dual.ppPath2&val4=/users/administrator/_portal


Integrating Oracle OBIEE Content using GO URL Syntax December 13, 2008

Filed under: -Oracle BI (OBIEE),Business Intelligence — sureshotstrategies @ 1:03 am
Tags:

This blog discusses various techniques for integrating Oracle OBIEE content into external web content using the GO URL syntax available in OBIEE. Note that OBIEE should be in SSO with the external app otherwise authentication info. is also required as part of this URL syntax. Most of this is also documented in OBIEE Web administrator guide, just some additional examples and few additional syntax are provided here and also putting them all at one place

Integrating Analytics Reports using Go URL syntax
Analytics supports a versatile “Go URL” syntax to incorporate Analytics content into external portals.

  • Go URL with parameters can be posted as a Form or
  • Issue it as a URL with parameters.

If you are issuing parameters as part of a URL, they need to be escaped properly.

Calling GO URL

When calling from within Analytics Dashboard or HTML view simply use the URL

saw.dll?GO

When calling from another screen from the same Web server then use the syntax

/analytics/saw.dll?Go

When calling from a different Web server the use full syntax
http://server_name_or_ip_address/Analytics/saw.dll?Go

Authentication with the GO URL

It is assumed that Analytics Web site has Single Sign On (SSO) enabled within corporate web-sites.Single Sign On authentication information is not required as a part of the “Go URL”. If Single Sign On is not enabled then additional authentication parameters must be supplied with the Go URL

http://server_name_or_ip_address/Analytics/saw.dll?Go&NQuser=xxx&NQPassword=xxx

Structure of the Go URL

Basic structure of the Go URL is as follows:

saw.dll?Go&Path=/Shared/Training/ParameterReport

Here, the path is the catalog path for the Analytics report ParameterReport. This basic URL syntax displays the default result view for the report in standard style.

There are number of optional arguments to this URL syntax

Displaying Report Results in different format

Display ‘Modify’, Download’ ‘Print’, ‘Refresh’ options along with the report

saw.dll?Go&Path=/Shared/Training/ParameterReport&Options=mdr

Print report in HTML format
saw.dll?Go&Path=/Shared/Training/ParameterReport&Action=print

Print in xx format, where xx=PDF,Excel, mht or xml
saw.dll?Go&Path=/Shared/Training/ParameterReport&Action=print&format=pdf
saw.dll?Go&Path=/Shared/Training/ParameterReport&Action=print&format=excel
saw.dll?Go&Path=/Shared/Training/ParameterReport&Action=print&format=mht
saw.dll?Go&Path=/Shared/Training/ParameterReport&Action=print&format=xml

Download report directly in the xx Format where xx= Excel, csv or mht
saw.dll?Go&Path=/Shared/Training/ParameterReport&Action=download&format=csv
saw.dll?Go&Path=/Shared/Training/ParameterReport&Action=download&format=excel
saw.dll?Go&Path=/Shared/Training/ParameterReport&Action=download&format=mht

Note that download does not support filters to be passed from the GO URL

Showing specific view of the report
saw.dll?Go& Path=/Shared/Training/ParameterReport &ViewName=pivot

Displaying all the records in a table view
saw.dll?Go&Path=/Shared/Training/ParameterReport &Action=Scroll&P5=-1&ViewID=go~Table

Displaying Dashboard or Dashboard Pages

Syntax for displaying entire Dashboard or specific Dashboard pages URL syntax is
saw.dll?Dashboard&PortalPath=/shared/Training/_Portal/Training

Displaying specific Dashboard page
saw.dll?Dashboard&PortalPath=/shared/Training/_Portal/Training&Page=Sales%20by%20Region

Displaying specific Dashboard page in PDF format
saw.dll?Dashboard&PortalPath=/shared/Training/_Portal/Training&Page=Sales%20by%20Region&Action=print&format=pdf

Passing Parameters to the Report using Go URL optional argument

The Go URL can also be used to pass context such as filters to a destination request. This is done by adding additional parameters to the call. You need to make sure that any columns you are passing are set up in the destination with Is Prompted filters, or specific default filters. Up to 6 parameters can be passed to the target report

New syntax for GO URL in addition passing the parameters only supported in OBIEE 10.1.3.2 or above

New syntax for Go URL in Analytics. You can now pass as many parameters and values as you want
note the syntaxt &col1=&val1=

http://webserver/analytics/saw.dll?Go&Path=%2Fshared%2FSupplier%2FRegionDollars&Action=Navigate&col1=Periods.%22Year%22&val1=%221999%22&op1=eq&nquser=Administrator&nqpassword=Administrator

Also an operator can be included in the URL, default is ‘eq’ if op1 etc. are not included
http://webserver /analytics/saw.dll?Go&Path=%2Fshared%2FSupplier%2FRegionDollars&Action=Navigate&col1=Periods.%22Year%22&val1=%221998%22&op1=gt&nquser=Administrator&nqpassword=Administrator

The syntax is pretty flexible and can include as many parameters and operators there is no limit

http://webserver/analytics/saw.dll?Dashboard&PortalPath=%2Fusers%2Fadministrator%2F_portal&Page=TestPrompts&Action=Navigate&col1=Markets.Region&val1=%22EASTERN%20REGION%22&col2=Markets.District&val2=%22PHILADELPHIA%20DISTRICT%22&col3=Markets.Market&val3=%22PHILADELPHIA%22&col4=Periods.%22Year%22&val4=%222001%22&col5=Periods.%22Month%22&val5=%222001-03-01%22&col6=Periods.Week&val6=%22WEEK%20ENDING%2003%2F10%2F01%22&col7=Products.Type&val7=%22COATINGS%22&col8=Products.Brand&val8=%22Enterprise%22&col9=Products.UPC&val9=%22Enterprise%20Steel%20Gloss%22&nquser=Administrator&nqpassword=Administrator

http://webserver/analytics/saw.dll?Go&Path=%2Fusers%2Fadministrator%2FAllPromptTestReport&Action=Navigate&col1=Markets.Region&val1=%22EASTERN%20REGION%22&col2=Markets.District&val2=%22PHILADELPHIA%20DISTRICT%22&col3=Markets.Market&val3=%22PHILADELPHIA%22&col4=Periods.%22Year%22&val4=%222001%22&col5=Periods.%22Month%22&val5=%222001-03-01%22&col6=Periods.Week&val6=%22WEEK%20ENDING%2003%2F10%2F01%22&col7=Products.Type&val7=%22COATINGS%22&col8=Products.Brand&val8=%22Enterprise%22&col9=Products.UPC&val9=%22Enterprise%20Steel%20Gloss%22&nquser=Administrator&nqpassword=Administrator

Old syntax for passing parameters works both in OBIEE and previous releases e.g. 7.7, 7.8, 10.1.3.1 etc.

Pass one parameter
saw.dll?Go&Path=/Shared/Training/ParameterReport&Action=Navigate&P0=1&P1=eq&P2=Periods.Year&P3=1+1999
Pass 2 parameters
saw.dll?Go&Path=/Shared/Training/ParameterReport&Action=Navigate&P0=2&P1=eq&P2=Periods.Year&P3=1+1999&P4=eq&P5=Customers.State&P6=1+CA

Here the operator P1=eq can be of different type as documented in the Siebel Analytics Web Admin guide e.g. like, lt, gt etc.
saw.dll?Go&Path=/Shared/Training/ParameterReport&options=md&Action=Navigate&P0=2&P1=eq&P2=Customers.State&P3=1+CA&P4=like&P5=Products.Type&P6=1+”B%”

Include the numeric parameter value in “ e.g. &P2=Periods.Year&P3=”1998”
Also position Like operator at the end of the parameter list.

Passing parameter to a Dashboard prompt

If a Dashboard is using prompts then values can be passed to it similar to above syntax as follows
http://webt43/analytics/saw.dll?Dashboard&PortalPath=/shared/Training/_Portal/Training&Page=Filters&Action=Navigate&P0=1&P1=eq&P2=Products.Type&P3=Beef

Issuing Direct SQL to Siebel Analytics using URL syntax

Following URL syntax can also be used to directly issue a SQL against Analytics
saw.dll?Go&SQL=select+Region,Dollars+from+SupplierSales
following URL will bypass web cache and issued directly to the Analytics server
saw.dll?Go&IssueRawSQL=select+Region,Dollars+from+SupplierSales

Calling BI Publisher reports directly similar to GO URL

URL to directly call a BI Publisher report.
It will prompt the login screen if BI publisher is not single sign-on with the calling app

http://webserver:9704/xmlpserver/Business+Intelligence/Paint+Demo/Paint+Demo.xdo

Calling BI publisher report from OBIEE URL similar to Go URL syntax
Use ExecuteReportObject syntax

http://webserver/analytics/saw.dll?ExecuteReportObject&Path=/Business%20Intelligence/Paint%20Demo/Paint%20Demo.xdo

New syntax for Go URL in Analytics. You can now pass as many parameters and values as you want
note the syntaxt &col1=&val1=

http://webserver/analytics/saw.dll?Go&Path=%2Fshared%2FSupplier%2FRegionDollars&Action=Navigate&col1=Periods.%22Year%22&val1=%221999%22&nquser=Administrator&nqpassword=Administrator

Calling a Dashboard page works the same way.
If Page has some prompts then those can also be filtered using new syntax

http://webserver/analytics/saw.dll?Dashboard&PortalPath=%2Fusers%2Fadministrator%2F_portal&Page=page2&Action=Navigate&col1=Periods.%22Year%22&val1=%221999%22

If a page has only a BI publisher report and also has a prompt then
You can pass filters to the BI publisher report using Go URL syntax as below

http://webserver/analytics/saw.dll?Dashboard&PortalPath=%2Fusers%2Fadministrator%2F_portal&Page=page2&Action=Navigate&col1=Periods.%22Year%22&val1=%221999%22


Hyperion Essbase and OBIEE November 27, 2008

Filed under: Uncategorized — sureshotstrategies @ 4:58 am

http://www.oracle.com/technology/pub/articles/rittman-essbase.html

Click to access Essbase%2011.1.1%20Installation%20Tutorial.pdf

http://orabiz.wordpress.com

Click to access EB5295.pdf

Click to access Under%20the%20Covers%20of%20Oracle%20OLAP%20and%20Oracle%20Essbase.pdf


Usage Tracking settings in OBIEE NQSConfig.INI file November 20, 2008

Filed under: Uncategorized — sureshotstrategies @ 7:33 am

IN NQSConfig.INI sample working settings
[ USAGE_TRACKING ]
ENABLE = YES;
//==============================================================================
// Parameters used for writing data to a flat file (i.e. DIRECT_INSERT = NO).
//
STORAGE_DIRECTORY = ;
CHECKPOINT_INTERVAL_MINUTES = 5;
FILE_ROLLOVER_INTERVAL_MINUTES = 30;
CODE_PAGE = “ANSI”; // ANSI, UTF8, 1252, etc.
//
//==============================================================================
DIRECT_INSERT = YES;
//==============================================================================
// Parameters used for inserting data into a table (i.e. DIRECT_INSERT = YES).
PHYSICAL_TABLE_NAME = “OBI Usage Tracking”.”Catalog”.”dbo”.”S_NQ_ACCT” ;
CONNECTION_POOL = “OBI Usage Tracking”.”Usage Tracking Writer Connection Pool” ;
BUFFER_SIZE = 10 MB ;
BUFFER_TIME_LIMIT_SECONDS = 5 ;
NUM_INSERT_THREADS = 5 ;
MAX_INSERTS_PER_TRANSACTION = 1 ;
//==============================================================================
IN the physical layer the folder structure is as follows:


Few Installation tips for OBIEE in Widows October 29, 2008

Filed under: -Oracle BI (OBIEE) — sureshotstrategies @ 6:08 pm

How to Install Oc4j as a Windows Service

OC4J as a Service
Following the last post on stopping oc4j from automatic running, you may want to run oc4j as a service, so that is can be added to a batch file that starts all the analytics services.

So, to Run OC4J as a windows service

If you want to run oc4j as a windows service download the open source tool named JavaService.exe from http://javaservice.objectweb.org/ which can create Windows Services for Java Programs, adjust and execute the following command:
javaservice -install “Oracle BI: OC4J Service” “D:\jdk1.5.0_09\jre\bin\client\jvm.dll” -XX:MaxPermSize=128m -Xmx512m “-Djava.class.path=d:\OracleBI\oc4j_bi\j2ee\home\oc4j.jar” -start oracle.oc4j.loader.boot.BootStrap -description “Oracle BI Oc4J Service”

Now you can add to your ‘net start’ commands batch file.

Credit to Andreass in the Majendi team for this.

How to Install OBIEE on Winodws XP Home Edition

OBIEE installation on XP Home Edition or even on some dell laptops has been a mystery.However after browsing through seven skies and taking a religious trip to the mountains bare foot ,God finally answered my request and I was able to install OBIEE on my DELL inspiron 600m which runs on a windows XP Home Edition.Follow the steps below and one will be able to install OBIEE on their machine running XP Home Edition

1)First find a machine with Windows XP Professional most of the corporate machines and laptops have it,Also have a USB handy.
2)Now browse to the windows folder of that machine and look for the System32 folder.
3)Plug the USB in the system and grab the SYSTEMINFO.EXE from the XX:\WINDOWS\System32 folder and copy this file into the USB.
4)Unplug the USB and plug into your machine that is running XP Home Edition.
5)Browse to the Windows folder find the System32 folder and copy the SYSTEMINFO.EXE from the USB in the System32 folder.
Once the file has been copied into the folder restart the computer and try to run the OBIEE installation and it should work like a charm.

Happy installation!
If you have any further questions please do email me at mfarhanalam@gmail.com

What is SA Systems Subject Area and How to set it up

Good one from

http://oraclebizint.wordpress.com/2008/04/25/oracle-bi-ee-101332-sa-system-subject-area-autoloading-profiles-and-bursting/

Posted by SureShot Strategies at 10:26 PM
0 comments

Labels: delivers, obiee, sa system

How to setup Proxy feature in OBIEE

To authorize users to act for others, perform the following tasks:

  1. Defining the Association Between Proxy Users and Target Users – Define a Database table
  2. Creating Session Variables for Proxy Functionality – init block to initialize repository session variable
  3. Modifying the instanceconfig.xml File for Proxy Functionality- configuration changes for enabling proxy
  4. Creating a Custom Message Template for Proxy Functionality – custom message that runs the DB query from web
  5. Assigning the Proxy Privilege – Required Privileges for proxy
  1. Create a table in the database where relationship between proxy and target user is defined. Note that this can be different database than the main DW,

Basic requirement is to have a connection pool pointing the database


  1. Create 2 initialization blocks dependent on Authentication that initializes Proxy variable in RPD


  1. Make changes in the instanceconfig.xml file for enabling proxy. For example: (Check presentation admin guide for more info)

<LogonParam>

<TemplateMessageName>LogonParamSQLTemplate</TemplateMessageName>

<MaxValues>100</MaxValues>

</LogonParam>

  1. Create a custommessage.xml file with following content that specifies template for getting target users for a given proxy. Sample file is given below. Note that the query use Execute physical syntax so the connection pool for example, “Paint.Paint” has execute physical flag enabled in the RPD

    <?xml version=”1.0″ encoding=”utf-8″?>

    <WebMessageTables xmlns:sawm=”com.siebel.analytics.web/message/v1″>

    <WebMessageTable translate=”no”>

    <WebMessage name=”LogonParamSQLTemplate”>

    <XML>

    <logonParam name=”RUNAS”>

    <getValues>EXECUTE PHYSICAL CONNECTION POOL paint.paint select targetuserid from Proxy where userid=’@{USERID}'</getValues>

    <verifyValue>EXECUTE PHYSICAL CONNECTION POOL paint.paint select targetuserid from Proxy where userid =’@{USERID}’ and targetuserid=’@{VALUE}'</verifyValue>

    <getDelegateUsers>EXECUTE PHYSICAL CONNECTION POOL paint.paint select userid, proxylevel from Proxy where targetuserid=’@{USERID}'</getDelegateUsers>

    </logonParam>

    </XML>

    </WebMessage>

    </WebMessageTable>

    </WebMessageTables>

This message should be placed in

You can create the custom message template in one of the following files:

The custom message file in the SADATAROOTDIR\web\msgdb\customMessages folder, where

SADATAROOTDIR is the installation directory

A separate XML file named custommessages.xml in the SADATAROOTDIR\web\msgdb folder, where SADATAROOTDIR

is the installation directory

  1. Enable Proxy privilege in the Webcat from Settings->Administration->Manage Privileges and look for proxy and provide access to “Act as Proxy” to specific groups for which proxy should be enabled.
  2. Troubleshooting, if there is any error during Proxy feature use look into SAW log file. It will write some error message there. Also check NQServer.log file.


Oracle Business Intelligence Resource library October 28, 2008

Filed under: Uncategorized — sureshotstrategies @ 5:33 pm

Oracle Business Intelligence Resource library

http://www.oracle.com/appserver/business-intelligence/resource-library.html

Good location for some white-papers/resource including some benchmark results


How to change Title logo based on user selected value October 24, 2008

Filed under: Uncategorized — sureshotstrategies @ 7:35 pm

Use Narrative view with formatting and then Presentation variable.

For Customer = AMERICAN EXPRESS

For Customer = FORD

First one here is TITLE view, tried using the presentation variable in Title View Logo but that didn’t

work. Second one is a narrative view with exact same HTML formatting as Title view, here pv work fine.

Here is the code(you can copy HTML from View Source). Put Narrative on the top and don’t use title view

<table class=”TitleTable” cellspacing=”0″ style=”” width=”100%”><tr><td class=”TitleLogo” style=”” rowspan=”4″><img border=”0″ src=”/analytics/res/s_oracle10/images/@{pvCustomer}.jpg”></td><td class=”TitleCell” style=”” title=””>Performance Summary – @{pvCustomer}</td></tr><tr><td class=”TitleNameCell” style=”” title=””></td></tr></table>


Oracle BI EE 10.1.3.3/2 – SA System Subject Area – Autoloading Profiles and Bursting October 7, 2008

Filed under: Uncategorized — sureshotstrategies @ 8:41 pm

Oracle BI EE 10.1.3.3/2 – SA System Subject Area – Autoloading Profiles and Bursting

Posted by Venkatakrishnan J on April 25, 2008

Those users who have worked with Siebel Analytics 7.7 or above, they would be aware of a special subject area called SA System subject area that was necessary to set up Delivers. But with the advent of new releases(10.1.3.3 and above), SA System subject area is not mandatory any more. But still SA System Subject area can be very useful in a lot of scenarios. One of the major uses of this special subject area is that, by setting this up one can automatically populate the Delivery Profiles of all the users. If this is not setup, one would have to manually go into My Account section of each and every user and then set it up. For example, a typical use case is, you would be having the list of users and their corresponding email ids in an excel file. You do not want the users to manually go and enter their email ids. In such a case, just setup the SA System subject area, then all the users would automatically get their email ids, phone, pagers etc automatically assigned to their profiles. Today, we shall see how to go about setting this subject area. Lets start with a simple table script that would help us to store all the Users, their corresponding Groups and also their email ids, pager and phones. Remember, SA System subject expects you to specify all the shown columns below.

view plaincopy to clipboardprint

  1. CREATE TABLE SA_SYSTEM  
  2. (  
  3. EMAIL VARCHAR2(100),  
  4. EMAIL_PRIORITY VARCHAR2(10) DEFAULT ‘HNL’,  
  5. EMAIL_TYPE VARCHAR2(50) DEFAULT ‘html’,  
  6. CELL_PHONE VARCHAR2(40),  
  7. CELL_PHONE_PRIORITY VARCHAR2(20),  
  8. PAGER VARCHAR2(20),  
  9. PAGER_PRIORITY VARCHAR2(30),  
  10. HANDHELD VARCHAR2(20),  
  11. HANDHELD_PRIORITY VARCHAR2(30),  
  12. TIMEZONE VARCHAR2(100),  
  13. GROUP_NAME VARCHAR2(20),  
  14. LOGON VARCHAR2(50) NOT NULL,  
  15. DISPLAY_NAME VARCHAR2(100),  
  16. LOCALE VARCHAR2(20) DEFAULT ‘en’,  
  17. LANGUAGE VARCHAR2(20) DEFAULT ‘en’  
  18. )  

CREATE TABLE SA_SYSTEM

(

EMAIL VARCHAR2(100),

EMAIL_PRIORITY VARCHAR2(10) DEFAULT 'HNL',

EMAIL_TYPE VARCHAR2(50) DEFAULT 'html',

CELL_PHONE VARCHAR2(40),

CELL_PHONE_PRIORITY VARCHAR2(20),

PAGER VARCHAR2(20),

PAGER_PRIORITY VARCHAR2(30),

HANDHELD VARCHAR2(20),

HANDHELD_PRIORITY VARCHAR2(30),

TIMEZONE VARCHAR2(100),

GROUP_NAME VARCHAR2(20),

LOGON VARCHAR2(50) NOT NULL,

DISPLAY_NAME VARCHAR2(100),

LOCALE VARCHAR2(20) DEFAULT 'en',

LANGUAGE VARCHAR2(20) DEFAULT 'en'

)


Assume that we have 2 users <b>Administrator and Sample</b> in our repository. So, lets enter all their relevant details into the above table.

view plaincopy to clipboardprint

  1. INSERT INTO SA_SYSTEM(EMAIL, GROUP_NAME, LOGON, DISPLAY_NAME) VALUES (<a href=”mailto:’venkatakrishnan.janakiraman@oracle.com’,’Administrators’,’Administrator’,’Administrator’“>’venkatakrishnan.janakiraman@oracle.com’,’Administrators’,’Administrator’,’Administrator'</a>);  
  2. INSERT INTO SA_SYSTEM(EMAIL, GROUP_NAME, LOGON, DISPLAY_NAME) VALUES (<a href=”mailto:’krisvenky83@gmail.com’,’Administrators’,’Sample’,’Sample’“>’krisvenky83@gmail.com’,’Administrators’,’Sample’,’Sample'</a>);  
  3. COMMIT;  

INSERT INTO SA_SYSTEM(EMAIL, GROUP_NAME, LOGON, DISPLAY_NAME) VALUES (<a href="mailto:'venkatakrishnan.janakiraman@oracle.com','Administrators','Administrator','Administrator'">'venkatakrishnan.janakiraman@oracle.com','Administrators','Administrator','Administrator'</a>);

INSERT INTO SA_SYSTEM(EMAIL, GROUP_NAME, LOGON, DISPLAY_NAME) VALUES (<a href="mailto:'krisvenky83@gmail.com','Administrators','Sample','Sample'">'krisvenky83@gmail.com','Administrators','Sample','Sample'</a>);

COMMIT;

Lets look at what each of the above columns do

EMAIL – Stores the email addresses of the user.
EMAIL_PRIORITY – Can take 3 values. ‘H’ for High, ‘N’ for Normal, ‘L’ for low. ‘HNL’ means High, Low and Normal. You can use these in any combination.
EMAIL_TYPE – Can take ‘html’ or ‘text’. This primarily tells whether the email client supports html or only text.
CELL_PHONE – Cell phone details
CELL_PHONE_PRIORITY – Same as EMAIL_PRIORITY
PAGER – Pager details
PAGER_PRIORITY – Same as EMAIL_PRIORITY
HANDHELD – Handheld details
HANDHELD_PRIORITY – Same as EMAIL_PRIORITY
TIMEZONE – This can be Null. Basically tells the timezone of the user.
GROUP_NAME – The actual GROUPs to which the Logon user belongs.
LOGON – User Login Name
DISPLAY_NAME – User Display Name
LOCALE – Default it to ‘en. It specifies the user Locale.
LANGUAGE – Default it to ‘en’. It specifies the user Language.

Now, import the above created table into the repository and design your BM and Presentation Layers. You should rename the Presentation Layer columns to the one shown below.

Cell Phone
Cell Phone Priority
Display Name
Email
Email Priority
Email Type
Group Name
Handheld
Handheld Priority
Language
Locale
Logon
Pager
Pager Priority
Time Zone

If you use any other names, SA System subject area would not work.


Once this is done restart the presentation services. Now login as Administrator and go to Settings -> My Account. You would notice that the delivery profile would automatically be populated and also the email id would also have been associated to the profile. Same would be the case for the Sample user.


Sometimes this can be very useful. But always remember, if any user goes and modifies their delivery profile, that would take precedence over the SA System Subject area.. One other advantage of using this SA system subject area is that you can use this to do email bursting of reports. For example, in most cases, not every user would have the delivery profile created. In such a case, just load up the SA System subject area and then assign the email ids to the users. Just create a simple report on the SA System subject area to have a display on the LOGON names.


Use this in the conditional request and pass the LOGON field to the list of recipients.


This would automatically do the bursting to all the users. This would be very handy while doing mass email deliveries.